
In the age of sustainable living, creating your own biogas plant at home can be an effective way to reduce waste and generate renewable energy. A home-made biogas plant converts organic waste into methane gas, which can be used for cooking, heating, and even generating electricity. This guide provides a step-by-step approach to constructing your own biogas plant, offering a green solution that benefits both the environment and your household budget.
1. Understanding the Basics of Biogas Production
Before diving into construction, it’s crucial to understand the basic principles of biogas production. Biogas is produced through anaerobic digestion, a process where microorganisms break down organic material in the absence of oxygen, resulting in the production of methane and carbon dioxide. The main components of a biogas plant include the digester (where the digestion occurs), the gas holder (to store the produced biogas), and an inlet and outlet for feeding organic waste and removing the digestate.
2. Gathering the Necessary Materials
To build a simple home-made biogas plant, you’ll need the following materials:
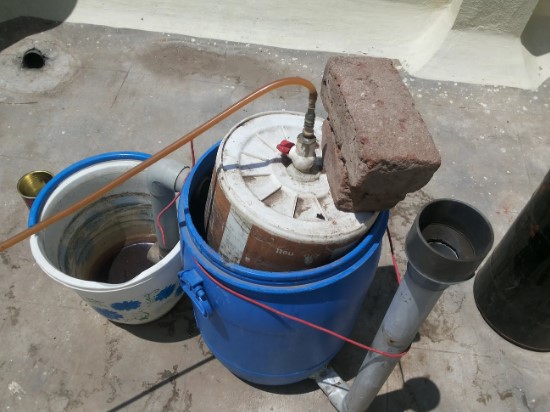
- A large, airtight container (e.g., an old oil drum or plastic tank) for the digester.
- A smaller container for the gas holder.
- PVC pipes for inlet and outlet connections.
- Valves and connectors to control the flow of biogas.
- A gas stove or burner to utilize the produced biogas.
- Adhesive or sealant to ensure airtight connections.

3. Constructing the Digester
– Step 1: Choose a suitable location for your digester. It should be close to your kitchen or where you plan to use the biogas and away from direct sunlight to avoid overheating.
– Step 2: Clean the large container thoroughly to remove any residues.
– Step 3: Drill two holes near the top of the container for the inlet and outlet pipes. Ensure the holes are airtight to prevent leaks.
– Step 4: Install the PVC pipes into the holes, using adhesive or sealant to secure them. The inlet pipe should be positioned slightly higher than the outlet pipe to allow for gravity feeding.
4. Setting Up the Gas Holder
The gas holder will collect and store the produced biogas. Follow these steps:
– Step 1: Use the smaller container as your gas holder. It should fit snugly into the digester without touching the bottom.
– Step 2: Drill a hole in the lid of the smaller container and insert a PVC pipe, securing it with adhesive.
– Step 3: Connect a flexible hose to the PVC pipe. This hose will transport the biogas to your stove or burner.
5. Feeding Organic Waste
Organic waste serves as the feedstock for your biogas plant. Suitable materials include kitchen scraps, vegetable peels, and animal manure. To feed the digester:
– Step 1: Chop or shred the organic waste into smaller pieces to facilitate faster digestion.
– Step 2: Mix the waste with water to create a slurry, making it easier to feed into the digester.
– Step 3: Pour the slurry into the digester through the inlet pipe, filling it about three-quarters full.
6. Maintaining the Biogas Plant
Proper maintenance ensures efficient biogas production:
– Daily Feeding: Regularly add organic waste to the digester to maintain a steady production of biogas.
– Mixing: Occasionally stir the contents of the digester to enhance microbial activity and gas production.
– Monitoring: Check for leaks and ensure all connections are airtight. Repair any leaks immediately to prevent loss of biogas. Such as the GASCHEK1000 portable biogas analyzer, use advanced photoelectric sensing principles to detect and analyze methane (CH4), oxygen (O2), carbon dioxide (CO2), hydrogen sulfide (H2S) and other gases, and accurately report , while effectively checking the digestive process.

7. Utilizing the Biogas
Once your biogas plant is operational, you can start using the produced biogas:
– Connect the Gas Holder: Attach the flexible hose from the gas holder to your gas stove or burner.
– Light the Burner: Open the valve and light the burner to start cooking with your home-made biogas.
Constructing a home-made biogas plant is an excellent way to embrace sustainable living by converting organic waste into a renewable energy source. With a basic understanding of biogas production, the right materials, and a bit of DIY spirit, you can build an efficient biogas plant that reduces waste, lowers energy costs, and provides an eco-friendly energy solution for your household. Start your green journey today and enjoy the benefits of home-made biogas!
